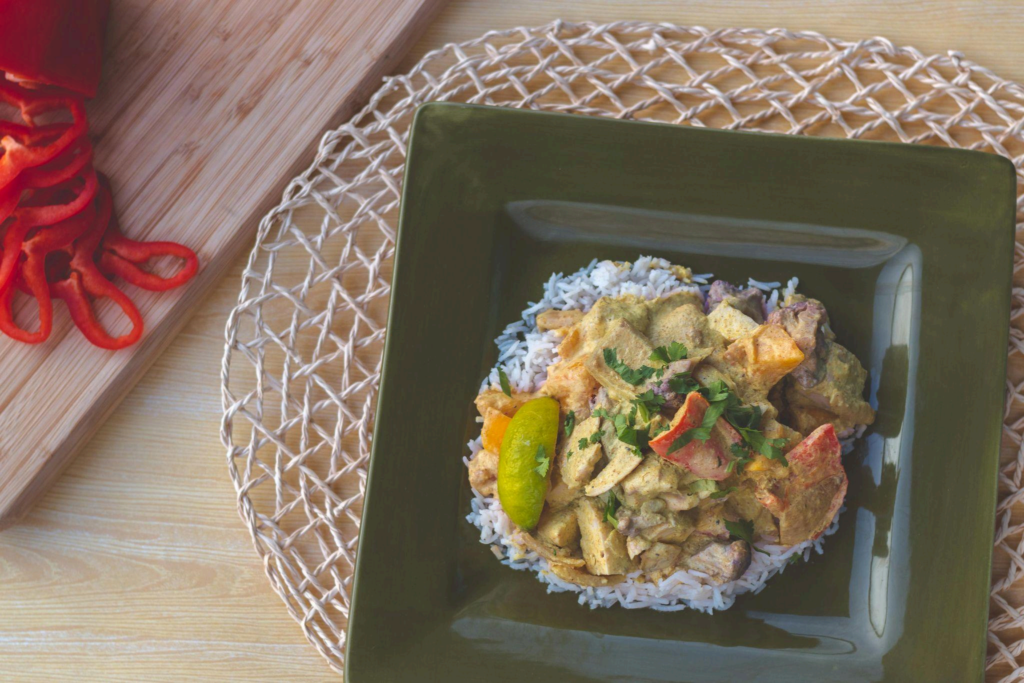
Coconut Curry Chicken
(Paleo & Keto Friendly)
Introduction
Craving something exotic yet comforting for dinner tonight? Look no further than Coconut
Curry Chicken—a Paleo and keto-friendly dish that manages to be both hearty and exciting.
Imagine succulent chicken pieces simmered in a velvety coconut milk sauce infused with
fragrant spices like turmeric, ginger, and garlic. The result? A vibrant, creamy curry that’s
brimming with complex flavor yet surprisingly easy to throw together. Whether you’ve
dabbled in curry-making before or are completely new to it, this recipe offers a gentle
introduction to Southeast Asian–inspired cuisine, without relying on processed ingredients,
grains, or sugars.
If you follow a Paleo or ketogenic lifestyle (or simply want a lower-carb meal), you’ll love how
this curry skips the usual starchy thickeners in favor of coconut milk’s rich texture. And while
it’s thoroughly satisfying as is, you can pair it with cauliflower rice, zucchini noodles, or a
simple green salad to keep carbs in check. The best part is that this dish suits busy
weeknights, weekend gatherings, and meal-prep sessions alike. Prepare a big batch, then
enjoy it for lunch the next day or freeze a portion for future cravings. Ready to transport your
taste buds? Let’s dig into how to make this crave-worthy Coconut Curry Chicken step by
step.
Why You’ll Love This Recipe
1. Paleo & Keto Approved: No grains, beans, or added sugars here—just wholesome
ingredients that align with low-carb and whole-food principles.
2. Rich & Creamy: Coconut milk creates a luscious sauce that coats the chicken and
veggies, ensuring every bite is packed with flavor.
3. Customizable Heat: Want a milder curry? Go easy on the chili. Looking for a spicy
kick? Turn up the heat with extra red pepper flakes or fresh chilies.
4. Simple Ingredients: Many of the needed spices might already be sitting in your
pantry, making this a budget-friendly choice.
5. Meal Prep Hero: Curries often taste even better the next day, which means you can
easily cook once and eat multiple times.Ingredients
Below is what you’ll need to serve about 4 people, though you can adjust for your appetite or
if you enjoy having leftovers.
For the Chicken & Veggies
● 1½ pounds boneless, skinless chicken thighs or breasts, cut into bite-sized
pieces
● 2 tablespoons coconut oil (or avocado oil)
● 1 medium onion, finely chopped (yellow or white onion works best)
● 2 cloves garlic, minced (or 1 teaspoon garlic powder in a pinch)
● 1 tablespoon fresh ginger, grated (or ½ teaspoon ground ginger if fresh isn’t
available)
● (Optional) 1 cup chopped bell peppers for color and extra nutrients
● (Optional) 1 cup sliced mushrooms for added texture
For the Curry Sauce
● 1 can (13.5–14 oz) full-fat coconut milk (look for no added sugars, typically found
in the international aisle)
● 1 tablespoon curry powder (choose mild or hot based on your preference)
● 1 teaspoon turmeric powder (for both flavor and vibrant color)
● 1 teaspoon ground coriander (optional, adds earthy notes)
● ½ teaspoon red pepper flakes or ½ fresh chili, finely chopped (adjust to taste if
you like it spicier)
● ½ teaspoon salt (or to taste)
● ¼ teaspoon black pepper (or to taste)
● 1 tablespoon fish sauce (optional but recommended for an umami punch; ensure
it’s Paleo-friendly)
● (Optional) ½ teaspoon sweetener (like monk fruit or stevia) if you want to balance
any bitterness, though many prefer it unsweetenedGarnishes & Serving
● Chopped cilantro or fresh basil for topping (adds freshness)
● Lime wedges for a tangy squeeze
● Cauliflower rice, zucchini noodles, or broccoli rice to keep things Paleo or keto
● (Optional) Red chili slices if you’re a heat lover
(Note) Always check labels for hidden sugars or non-Paleo additives, especially in curry
powders and fish sauces.
Step-by-Step Instructions
Step 1: Prep the Chicken & Veggies
1. Cut the Chicken: Using a sharp knife, chop chicken thighs or breasts into bite-sized
cubes, aiming for uniform pieces so they cook evenly.
2. Season Lightly: Sprinkle a small pinch of salt and pepper on the chicken pieces.
This initial seasoning builds the foundation of flavor.
3. Chop Veggies: Dice the onion, mince the garlic, grate the ginger, and prepare any
optional veggies you’re adding.
Conversation Tip: If you’re crunched for time, you can find pre-minced garlic and ginger in
the produce section of many grocery stores—or rely on garlic and ginger powders.
Step 2: Sear the Chicken
1. Heat the Oil: In a large skillet or Dutch oven, warm 1 tablespoon of coconut oil over
medium-high heat.
2. Add the Chicken: Carefully place the chicken pieces in the hot oil, spreading them
out so they don’t crowd. Cook for about 3–4 minutes on each side until lightly
browned. You’re not cooking them all the way through yet, just searing.
3. Transfer & Reserve: Once they develop a golden crust, remove the chicken to a
plate. We’ll finish cooking them in the sauce later.Conversation Tip: Overcrowding the pan can cause the chicken to steam instead of sear, so
if your skillet is small, consider doing this step in batches.
Step 3: Sauté the Aromatics
1. Add More Oil: If the skillet looks dry, add another tablespoon of coconut oil.
2. Onions First: Toss in the chopped onion. Sauté for about 3–5 minutes until it
becomes translucent and fragrant.
3. Garlic & Ginger: Stir in the minced garlic and grated ginger. Cook for about 1
minute, being careful not to let them burn—they can turn bitter if overcooked.
Conversation Tip: This step is where your kitchen starts to smell incredible, drawing
everyone to see what’s cooking.
Step 4: Build the Curry Sauce
1. Add Spices: Lower the heat to medium. Stir in your curry powder, turmeric powder,
ground coriander (if using), and red pepper flakes or chili. Let them toast
briefly—about 30 seconds—to release their aromas.
2. Pour in Coconut Milk: Gently shake your can of coconut milk before opening. Then
pour it into the skillet, scraping up any browned bits from the bottom with a wooden
spoon (these bits are full of flavor).
3. Season: Add salt, black pepper, and fish sauce (if desired). If you like a hint of
sweetness to balance the spice, stir in your optional sweetener.
4. Simmer: Bring the curry sauce to a gentle simmer, letting the spices mingle with the
coconut milk.
Conversation Tip: If you want a thicker sauce, you can let it simmer uncovered for a few
extra minutes to reduce. For a thinner consistency, add a splash of chicken or vegetable
broth.
Step 5: Combine Chicken & Veggies
1. Return Chicken: Place the partially cooked chicken back into the skillet. Stir to coat
each piece in the sauce.2. Optional Veggies: If you’re adding bell peppers, mushrooms, or other veggies, now
is the time to stir them in.
3. Finish Cooking: Reduce the heat to medium-low, cover the skillet, and let everything
simmer for about 8–10 minutes. The chicken should reach an internal temperature of
165°F (74°C).
Conversation Tip: Use a meat thermometer to ensure you don’t overcook the chicken.
Overdone chicken can become tough, and we want those pieces to stay juicy and tender.
Step 6: Final Taste & Adjustments
1. Taste Test: Dip a spoon into the sauce. Does it need more salt? More spice? Tweak
accordingly. If it’s too spicy, you can mellow it with a bit more coconut milk or a pinch
of sweetener.
2. Texture Check: If your sauce is too thick, add a small splash of water or broth. If it’s
too thin, let it simmer uncovered for a few more minutes.
3. Garnish: Just before serving, sprinkle fresh cilantro or basil across the curry for a
burst of color and freshness.
Conversation Tip: A final squeeze of lime juice can elevate the flavors even more, creating a
wonderful balance of creamy, spicy, and citrusy notes.
Serving Suggestions
● Cauliflower Rice: Keep it low-carb by spooning your Coconut Curry Chicken over a
bed of riced cauliflower. You can lightly sauté the cauliflower in coconut oil with a bit
of salt and pepper.
● Zucchini Noodles: Spiralize zucchini for a pasta-like feel, then briefly sauté or
microwave until just tender.
● Leafy Greens: A side salad of spinach or mixed greens dressed in a simple
vinaigrette offers a crisp contrast to the rich curry.
● Portion Control: If you’re carefully tracking carbs, measure out your serving of curry
and pair it with a weighed portion of cauliflower rice or veggies to stay on track.Meal Prep & Storage
● Batch Cooking: Double or triple the recipe if you want to have future meals ready to
go. Curries are famously freezer-friendly.
● Refrigeration: Store leftovers in an airtight container for up to 3–4 days. The flavors
may deepen over time, making next-day lunches extra tasty.
● Freezing: Cool the curry completely, then transfer to freezer-safe containers or
heavy-duty zip-top bags. Lay them flat for easier thawing. Frozen curry can last about
2–3 months.
● Reheating: Gently warm on the stovetop over low-medium heat. You might need to
add a splash of water or coconut milk if the sauce has thickened.
Variations & Substitutions
● Protein Swap: If chicken isn’t your preference, try shrimp (added towards the end of
cooking), turkey tenderloin, or even firm tofu (for those who aren’t strictly Paleo).
● Vegetarian/Vegan: Omit the chicken and increase the vegetables, such as sweet
potato (if you’re not strict keto), bell peppers, zucchini, or mushrooms. Ensure your
fish sauce replacement is vegan-friendly, like coconut aminos.
● Flavored Oil: Use ghee (clarified butter) if you can tolerate dairy and want a richer
flavor—just confirm it meets your dietary guidelines.
● Extra Veggies: Load up on your favorites—think broccoli florets, bok choy, carrots, or
baby spinach. Just be mindful that starchy veggies may increase carb counts for keto
dieters.
● Curry Paste: Replace curry powder with a Thai curry paste (red or green) for a
different flavor profile. Check labels to ensure no added sugars.
Common Questions
Q: How spicy is this curry on a scale from 1 to 10?
A: With the listed amounts of chili and red pepper flakes, you’ll typically get about a 5 or
6—mildly spicy for curry enthusiasts. If you’re sensitive to heat, start with less chili, or if
you’re a spice lover, turn it up with extra cayenne or even fresh chilies.Q: Can I use light coconut milk instead of full-fat?
A: You can, but the sauce may turn out thinner and less rich. It can also separate easier. For
best results in both taste and texture—especially in a keto context—full-fat coconut milk is
ideal.
Q: What if I don’t have fresh ginger and garlic?
A: Ground ginger and garlic powder can fill in, though the flavor won’t be quite as bright.
Substitute about ½ teaspoon ground ginger and ½ teaspoon garlic powder for the fresh
counterparts.
Q: Do I need a wok to make this recipe?
A: Not at all. A large skillet or Dutch oven works fine. As long as it has enough surface area
to brown the chicken and enough depth for the sauce, you’re good to go.
Q: Is fish sauce really necessary?
A: It’s not mandatory, but fish sauce adds an umami complexity often found in Southeast
Asian curries. If you skip it, consider adding a dash of coconut aminos or a pinch more salt
to maintain savory depth.
Conclusion
Coconut Curry Chicken (Paleo & Keto Friendly) demonstrates just how simple it can be to
whip up a restaurant-worthy meal at home—no exotic, hard-to-find ingredients required. By
focusing on a handful of core spices, rich coconut milk, and succulent chicken pieces, you’ll
end up with a dinner that’s comforting yet vibrant, all while staying within Paleo and keto
guidelines. The creaminess from the coconut milk contrasts beautifully with the gentle heat
of the chili peppers, and fresh ginger adds a zing that keeps each bite exciting.
Beyond its taste appeal, this curry is a champion for busy lifestyles, lending itself well to
batch cooking and versatile leftovers. Whether you’re immersing yourself in an evening of
new culinary experiences or simply trying to keep mealtime interesting while watching your
carb intake, this dish has you covered. Pair it with cauliflower rice or your favorite low-carb
side, and watch your taste buds travel to a land of warm spices, savory depth, and a hint of
luxurious sweetness. Bring out the serving bowls, garnish generously, and enjoy every
spoonful of this enticing Coconut Curry Chicken—no passport needed!